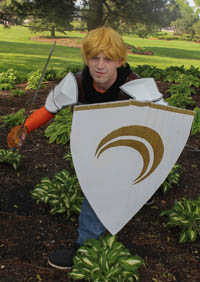
In this post I'm going to cover the process I went through for constructing Dalian's necklace. This is the third try for the necklace. The first try was an attempt using vinyl tubing coated with paint on the inside and glued to a piece of styrene to create the necklace. While this method was easy to create, the vinyl tubing did not look right for this application. The second attempt was using styrene tube glued to thin styrene. Problems bending the styrene and time constraints doomed this attempt. The present attempt uses styrene tube and bendable plastic from Micro Mark.

Creating the Base
The base of the necklace is created using bendable plastic from MicroMark. This plastic is bent by heating using a heat gun or boiling water. I created the bend by heating the plastic in a foil pan filled with boiling water and wrapped it around a can that was slightly smaller that the final desired side. A smaller can is necessary because the plastic will relax a bit once cool and will not keep the bend as tight as it was originally bent on the can. There are two warnings for this method. First, the water and plastic is hot so be careful not to burn yourself. Second, the plastic may release materials into the water as it is heated so be careful not to use a pot or any tools that may later come in contact with food. Once the base is bent and cooled, you can move on to bending the tubes.
Bending the Tubes
Bending the tubes requires some patience and a special tool. Before you start, you should buy the styrene tube which can be found at many hobby shops and a spring tubing bender which you can find at most hardware stores. The key here is to pick a common tube size such as 3/8 or 1/2 inch and a spring bender to match the tube size. The spring bender is inexpensive (around $3-$4) and will help to prevent the tube from collapsing when you bend it. To make the bend, insert the tube into the bender and place it in boiling water until the tube is pliable. It may take a couple minutes for the tube to become pliable because you are heating both the tube and bender. Be patient! I have found that trying to hurry the process will result in a kink in the final tube.;
Once your tube is pliable, remove it from the water and slowly make the tube bend around your form. Use a slow, smooth motion to make the bend to avoid kinking the tube. Once the tubing is bent, hold it in position while the spring cools and you can then remove the spring from the tube. Repeat the process for the second tube.
Assembling the Necklace
Once all parts are bent, you can proceed in assembling the necklace. To glue the styrene, I like to use Plasti Weld plastic cement. It will bond the styrene to the flexible plastic. Line the parts up and clamp them together. Then spread the cement along the joint and it will be drawn into the seam and fuse the plastic together. Since the pieces will not have exactly the same bend, you will need to work slowly and make sure everything lines up before you start. I like to have 10-15 spring clamps and clamp the entire tube in place and then glue the joint. You could try to glue in sections, but will need to be sure that the tube stays aligned so the beginning and end will both match up.
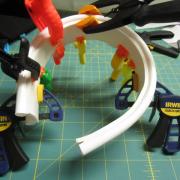
Here is a picture of one of the tubes during the gluing process:
Once you have the piece clamped and have applied the glue give it plenty of time to dry. I like to let it sit for at least a couple hours. You probably don't need that much time but I like to be sure since the joint is under stress. Once you have glued the first tube, insert a spacer against the first tube and then glue the second. I find that a strip of craft foam between the two tubes helps to keep them the same distance apart.
Final Adjustments
Once the glue has dried, you are ready to make final adjustments before painting. You will most likely need to cut a small amount from each end to allow the necklace to fit around your neck. You can also use boiling water to adjust the bend if needed but be careful not to kink the tubing while making the bend. Once it fits, you can sand and apply paint!